Showing posts with label erin schechtman. Show all posts

Monday, April 27, 2015

Erin's BIG hugs!

Truth, Justice, Hugs!

Avengers Assemble Hugs!

The Guardians of the Galaxy are Hooked on a Hug!

Here are the BIG hugs I did for Carol and John's Comics Free Comic Book Day! All three will be available as prints at the event Friday, May 1st and Saturday, May 2nd, along with tons of other merch!

Friday, April 3, 2015

Erin Schectman Caruso, WILD CARD!!

Erin! Doer of only good things. Teacher, Painter, Designer, new Aunt and Auntie to a flock of RBMC babies, our adopted little sister and secret mentor to ALL of us here in the Rust Belt Monsters.  When this group was forming we thought Erin would be a great addition because her style was the wild card among ours, that kick of unexpected flavor, the person who would make us see more and think differently.  Well, we weren't wrong but we got way more than that!  Most of us who couldn't call ourselves painters before after painting shoulder to elbow with our Swearin' Erin, can.  She's our Broadway singin', ear to ear grinnin' comic sans lovin', paint slingin' powerhouse known as Erin!  Check out a few of her amazing images below and be sure to check out SUPER GROUP HUGS, her latest foray into hot, pop culture character on pop culture character action!  Really great stuff!


Find more Erin here:

DISCLAIMER
Erin doesn't actually LOVE Comic Sans so much as she is in love with Comic Sans, a love that dare not speak it's name.   You can ask any other member of the RBMC ltd. and they will say it is so.  It is also fair to note that all other members of the RBMC are notorious goofer-offers and their opinion on human/font love is spurious at best.  

Wednesday, January 7, 2015

Erin's Instagram year!


As certain monsters like to remind me, I post to Instagram a lot, but don't often share my work here on the blog.  Whoops.

Here's a quick recap of a few of my favorite doodles you've missed this year!

Thursday, May 22, 2014

Birthday Ben


Today is Rust Belt Monster Ben Hale's Birthday. What a lucky girl am I to have him in my life!
Ben is hilarious, talented, intelligent, and has great taste in music but above all, he is kind. If the world was filled with Ben Hales it would be a much better place, but celebrating his birthday wouldn't be quite as special. Hope you had a great one, buddy.

Thursday, December 5, 2013

Happy Birthday Jim!

 
Yesterday was Jim Giar's Birthday.
Jim is many things.... a lover of white wine, a master of ink, a snazzy dresser, an amazing family man, and one of the wisest men I know. AND, on top of all that, he's a Monster! We are so lucky.
 
Happy Birthday Sir!

Wednesday, November 27, 2013

Painting In Progress


Working on a new painting, something a bit more experimental then usual. This is one, like many, that I started without a clear vision for the final piece. I like working this way, it's a totally a paint-by-gut-feeling sorta process. Hopefully it'll turn out well, fingers crossed!

 This composition is actually square, but the whole thing wouldn't fit on my scanner (hence the blurry image). So far, this has markers, colored pencil, gesso and watercolor on it. More to come.
 
Hope all of you out there have a wonderful Thanksgiving or (like in my case) THANKSGIVAKKUH: the best holiday of all time!
Can't wait to stuff my turkeys with latkes.

Thursday, November 7, 2013

Wednesday, October 30, 2013

The Bicycle Horror


I love drawing these blob-y ghost monsters, especially this time of year.
Stay tuned for colors by our own Tim Switalski!


Wednesday, October 23, 2013

Wednesday, August 21, 2013

Sneak Peak


I'm happy to finally unveil our first RBMC T-Shirt design! They will be debuting at our next few events, but you can pre-order now. Get 'em while their hot, folks!

Wednesday, August 14, 2013

STAMPS!

Been carving some stamps lately with my BFF Dee! Starting to get slightly addicted...

Mika Stamp:


Mika and Mika!

Here is a super basic, bare bones, tutorial on how to carve a stamp:
 
 1. Draw your design on tracing paper

2.  Transfer your drawing to a rubber carving block by flipping it so the drawing side is against the rubber.  Burnish the back of the tracing paper with a spoon. The drawing will be stuck to the rubber really easily!
3. Carve around the drawing with a #1 speedball carving tip.
4. Use a larger speedball tip to clear area around edges.
4. Trim excess rubber.
5. Ink and Stamp!

Wednesday, July 17, 2013

Superman Day!

This July 27th is Superman Day at our favorite comic shop - Carol and John's Comics here in Cleveland, Ohio where the Man of Steel was created 75 years ago. To celebrate, the RBMC and many other incredible artists each donated a comic book drawing to the shop.

My personal celebration has consisted of watching a ridiculous amount of Justice League Unlimited. With that in mind, here is my cover:


See you all next Saturday and have a very super week ;)

- Erin


Wednesday, July 10, 2013

ADVENTURE HUG!!


Hey Adventure Lovers! I made this for our buddy Angela's gallery show! It's cut paper and colored pencil and a little bit of marker. Adventure time is my favorite show ever. Shmowzow!


Wednesday, July 3, 2013

Red is for Roses

Second verse, same as the first. A little bit louder and a little bit worse.


 This is my second painting for "The Apron Covers It", an exhibition at the BAYarts center in Bay Village, Ohio that celebrates women by focusing on the theme of aprons. Is is a sister show to another one on the campus which features art about dresses. All of the women in this show are BAYarts faculty, including myself.

This painting uses the same models and encaustic painting techniques as in my previous post. If you want to learn more about how to paint this way, click here. I will also be teaching a workshop on Encaustics at BAYarts during the first week of August. If you are interesting in attending, you can get the details by clicking here.


"Red is for Roses"  • 18 in x 12 in wood panel • Colored Pencil, Watercolor, Marker, Gesso, Handmade Paper, Beeswax, Oil Paint • On Display at BAYarts in Bay Village Ohio Until August
Available through the gallery for $275.00 

Come see it live on Friday, July 5th at the gallery opening.
Thanks everyone!
- Erin

Wednesday, June 26, 2013

Encaustic Painting Demo!


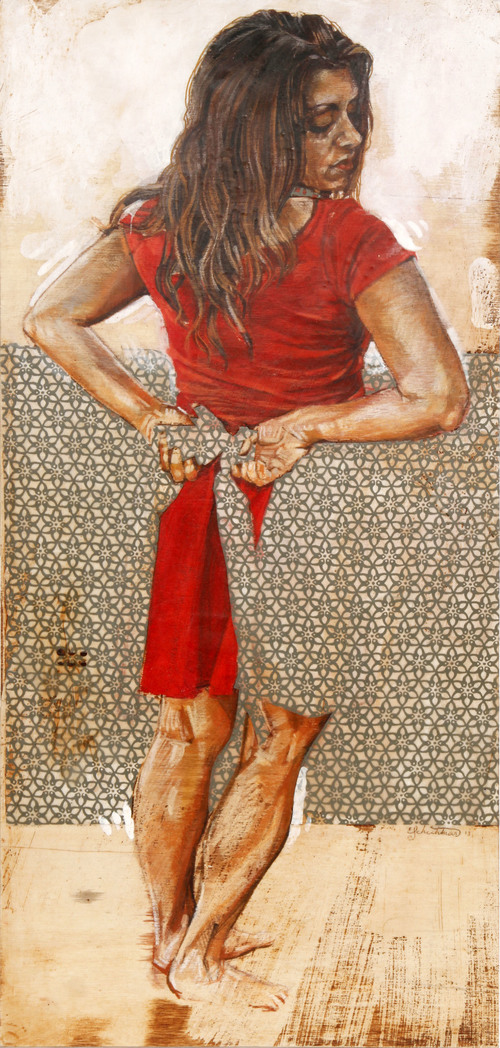
"Fadeaway" • 10 in x 22 in wood panel • Colored Pencil, Watercolor, Marker, Gesso, Handmade Paper, Beeswax, Oil Paint • On Display at BAYarts in Bay Village Ohio Until August

This week, I have been creating work for a group show at BAYarts in Bay Village, OH. The show opens on July 5th and features art that honors women's roles by focusing on a "Apron" theme. I am thrilled to be in the company of 9 other amazing female BAYart's teachers for this exhibit.

The painting above is the first of my two entries for the show. The model here is my beautiful friend Laura, who is an incredible photographer (and is super cool too!) 

Here's how I made it: I started with watercolor washes and marker over my vine charcoal drawing. I love how it bled into the wood!


Started working in the colored pencils. I ended up using a very limited pallet overall: White, Light Peach, Mandarin Orange, Dark Brown, and Terracotta Prismacolor pencils. I did pull out some reds of course when I got to her dress.


 The face is colored pencil over my watercolor wash with a touch of marker here or there. I used fabercastelle markers - 3 different shades of brown and red on the dress.


The white at the top here is gesso


Kitty break!


 Marker and colored pencil hair with washes of watercolor


Once I was finished rendering, I added the key element of this composition - some pretty handmade paper glued on with elmer's glue and water. It was very hard to wait until all the drawing was done since I was so excited to do this!


Time to add the beeswax. I brushed on the wax pretty roughly because I wanted a lot of texture to show, but I did smooth out the wax on and around her face with the heat tool. My favorite part is that the wax turns the white of the handmade paper translucent!


This is what it looks like with the beeswax... not much different yet


 This is a cool part - to get the texture of the wax to show, I brushed on burnt umber oil paint. The paint is diluted with Liquin medium so it will dry quickly.


This is what the painting looked like covered with burnt umber.


Using a paper towel (and gloves) I started removing the paint layer.


The paint sticks in the rough texture I created with the wax and to the wood like magic!
You never really know what you're going to get in this process and the randomness is exciting. You can always fix parts that don't work, of course!


I wanted the final piece to be a little bit brighter, so I continued to wipe some areas of the paint off using a paper towel soaked in turpenoid, making sure to preserve the textured areas I love.


 Final Painting - "Fadeaway" (named in honor of Coles Phillips' famous illustration technique)


Come see it live on Friday, July 5th at the gallery opening.
Thanks everyone!
- Erin